How to Use Bigasoft Total Video Converter for Mac?
Detailed Guide on How to Convert Video/Audio; Download Video or Edit Media Files
April 18th 2013 by Emily Moore
Tags: how to use total video converter for mac, convert video, convert audio, convert video to audio, download video, edit movies
Overview
This article will describe a detailed tutorial on how to use Bigasoft Total Video Converter for Mac in 3 parts.
Preparation: Free download, install and launch Bigasoft Total Video Converter for Mac

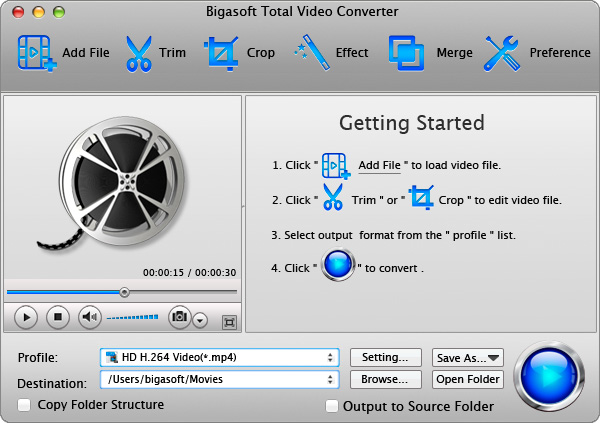
Screenshot
This is the main window of Bigasoft Total Video Converter for Mac
Part 1: Convert video, audio files
- This guide applies to convert various video formats including AVI, WMV, WTV, DVR, MP4, M4V, MOV, MPG, MPEG, MPEG-1, MPEG-2, VOB, ASF, TS, MKV, 3GP, FLV, F4V, SWF, MPV, RM, RMVB, MXF, AVCHD, MTS, M2T, M2TS, WebM, MOD, TOD, MVI, MTV, BIK, Fraps and etc.
- This guide applies to convert all popular audio formats including FLAC, CAF, AIFF, Apple Lossless ALAC, M4A, OGG, 3GA, QCP, VOC, VOX, PCM, APE, AU, RA, WMA, MP3, WAV, SHN, AMR, MP2, AC3, AAC, DTS, MPC and etc.
- This guide also applies to convert video to audio format.
Step 1 Add media files to Bigasoft Total Video Converter for Mac
Click "Add File" button to import the video or audio files which you want to convert. Or simply drag and drop the media files to the main interface Bigasoft Total Video Converter for Mac.

Step 2 Set output format
Click the "Profile" drop-down button to select desired video or audio format as output profile.
Step 3 Finish conversion
Click the "Convert" button to start and finish converting your media files to desired video or audio format.
Part 2: Download or convert online video
- This guide applies to download your favorite videos from 100+ sites like YouTube, Facebook, VEVO, Vimeo, Dailymotion, Break, Metacafe, LiveLeak, Aol, TED, Comedycentral, Hulu, MTV, CBS, Yahoo, BBC, VH1, ESPN, BlipTV, WatTV, VideoBash, FunnyOrDie, The NY Times, Adult sites, etc.
- This guide applies to download online video as well as convert the downloaded video to almost all popular video or audio format.
Step 1 Download online video files
Click the "Add File" drop down menu, then select "Add YouTube Video..." to paste the video URL and then click "OK" button, Bigasoft Total Video Converter for Mac will start downloading the video and the downloaded video will automatically appear in the main window of this software. Finally, you can click "Open Folder" button to get the downloaded online video files.

If you also want to convert the downloaded video to other video or audio format, please continue the following Step 2 and Step 3.
Step 2 Set output format
Click the "Profile" drop-down button to select your favorite video or audio format as output profile just the same as you do in the Step 2 of Part 1.
Step 3 Convert the downloaded video files
Click the "Convert" button to start and finish converting the downloaded video to your desired video or audio format.
Part 3: Edit video
Besides converting or downloading video files, Bigasoft Total Video Converter for Mac is also equipped with advanced video editing function like trim, crop, effect, rotate, add subtitle, add audio tracks, merge, adjust video image, adjust audio volume, split by chapter markers, take snapshot, watermark and etc.
Trim video
Click "Trim" button to open the Trim window, and follow the steps below to capture a clip from your movie.

Set Trim Time
- There are three methods to set trim time:
- Method 1: Enter the start time in the Start Time box, then enter the end time in the End Time box.
- Method 2: Drag the scissors bars under the preview window where you want to trim, and then the time will be shown in the Start Time box and End Time box for your reference.
Tips
- Click "Reset All" to restore the settings to defaults.
- Click "OK" to save the settings if you have completed video cropping.
Crop video
Click "Crop" button to open the Crop Video window, then you can crop your video and set the zoom mode according to your need.

Crop Your Video
- Method 1: Crop by adjusting the crop frame The crop frame is the dotted line around the movie video. There are eight small adjustment boxes on the crop frame. Each adjustment box allows you to crop the movie video from a different position. To crop your movie video, you can just move your mouse cursor to an adjustment box and drag the crop frame.
- Method 2: Crop by setting the crop values There are four crop values on the lower right part of the crop window: Top, Bottom, Left and Right. You can set each value to crop your movie video, and the crop frame will move accordingly.
Set the Zoom Mode
- You can also set the output aspect ratio from the Zoom Mode according to your need. There are four choices available: Keep Original, Full Screen, 16:9 and 4:3.
- Keep Original: Keep the aspect ratio of the crop size.
- Full Screen: Stretch your cropped video to fit for the aspect ratio of the resolution setting.
- 16:9: Stretch your cropped video to fit for the aspect ratio of 16:9.
- 4:3: Stretch your cropped video to fit for the aspect ratio of 4:3.
Tips
- The effect will be displayed in the "Output Preview". Always check and preview to see if the output video is in best fit.
- Click "Reset All" to restore the settings to defaults.
- Check the box "Apply to All" to apply the effect to all video files.
- Click "OK" to save the settings if you have completed video cropping.
Effect video
- 1.Select the video file you want to edit.
- 2.Click Effect button to open the Effect window.

- 3.Check the box before the effect that you want to change the display effect of the video from the effect droplist
- 4.The effect will be displayed in the "Output Preview" window. Always check and preview to see if the output video is in best fit.
- 5.Click "Reset All" if you want to restore the settings to defaults.
- 6.Check the box "Apply to All" if you want to apply the effect to all video files.
- 7.Click "OK" to save the settings if you have completed editing of video effect.
Rotate video
- Bigasoft Total Video Converter for Mac supports two options: "Flip Horizontal" and "Flip Vertical"
- 1.Choose the video file you want to rotate.
- 2.Click Effect button to open the Effect window.

- 3.Press
 or
or  button to
rotate the videos
button to
rotate the videos - 4.The effect will be displayed in the "Output Preview". Always check and preview to see if the output video is in best fit.
- 5.Click "Reset All" if you want to restore the settings to defaults.
- 6.Check the box "Apply to All" if you want to apply the rotation to all video files.
- 7.Click "OK" to save the settings if you have completed the rotation.
Add subtitle
- Click Effect button to open the Video Edit window and switch to "Subtitle" pane in which you can add and edit subtitles by pressing the "Subtitle" tab. The original
subtitles will all be listed in the subtitle list.

- 1.Click
 to
add a subtitle file from your local disk. It will be displayed in the subtitle list. Repeat this step to add multiple subtitles. Click
to
add a subtitle file from your local disk. It will be displayed in the subtitle list. Repeat this step to add multiple subtitles. Click  to delete the
added in subtitles.
to delete the
added in subtitles. - 2.Check the box before the subtitle which you want to add to the output video.
- 3.Set subtitle transparency: drag the Transparency slider right and left or enter a value in the right textbox or click up and down arrows to adjust the subtitle transparency.
- 4.Set subtitle position: drag the Vertical Position slider right and left or enter a value in the right textbox or click up and down arrows to adjust the vertical position of the subtitle.
- 5.Set font style: click Font drop-down list to choose preferred font for subtitle, Color drop-down list to choose desired font color, Size drop-down list to choose font size, Style drop-down list to choose font style.
- 6.The effect will be displayed in the "Output Preview" window. Always check and preview to see if the output video is in best fit. Click "Reset All" if you want to restore the settings to defaults. Check the box "Apply to All" if you want to apply the subtitle to all video files. Click "OK" to save the settings if you have completed editing of video effect.
Tips
- 1.Bigasoft Total Video Converter for Mac right now only supports adding and customizing one subtitle to output video.
- 2.You may open the subtitle editing window by clicking "Edit Subtitle" in the subtitle drop list listed in the taskbar.
- 3.You may freely assign subtitles to video file one by one in the taskbar.
Merge video
To join the selected contents into one file, click ![]() from context menu option. The merged file is named like "Merge 1" with extention name, you may change the file name by just
clicking the original file name and entering your disired one.
from context menu option. The merged file is named like "Merge 1" with extention name, you may change the file name by just
clicking the original file name and entering your disired one.

Adjust video image
- 1.Choose a video file from the list, click Effect button to open the Video Edit window and switch to "Image" pane in which you can edit video image by pressing the "Image" tab.
-

- 2.Set brightness: drag the Brightness control slider to set the brightness.
- 3.Set contrast: drag the Contrast control slider to adjust contrast.
- 4.Set saturation: drag the Saturation control slider to adjust video saturation.
- 5.The effect will be displayed in the "Output Preview" window. Always check and preview to see if the output video is in best fit.
- 6.Click "Reset All" if you want to restore the settings to defaults.
- 7.Check the box "Apply to All" if you want to apply the effect to all video files.
- 8.Click "OK" to save the settings if you have completed editing of the video effect.
Adjust audio volume
- 1.Select and check the video/audio files you want to edit their audio volume.
- 2.Press "Setting..." beside "Profile". The "Advanced Settings" Window will pop up right beside the main window. In the "Advanced Settings" Window, Press "Advanced Settings" tab, and then go to "Audio" column. Click 100% tab on the right of "Volume", and choose volume ratio from the drop-down list. For setting higher or lower volume or setting any volume ratio, just enter the desired volume ratio like 300%, 400%.
- 3.If you do not need any sound of the output video, simply assign audio tracks to "None" to video file in the taskbar. Or go to "Advanced" tab in "Advanced Settings" Window and set "Disable Audio" as "True".
- 4.Always check and play to see if the audio volume is in the best fit.

Split by chapter markers
- Click "Add File" to add files or locate the music and movies files with chapter markers and simply drag and drop to Bigasoft Total Video Converter for Mac.
- Select "Split by Chapter" option from context menu.
- Bigasoft Total Video Converter for Mac will recognize the embedded chapters in the music and video files in whatever formats, be it M4A files, AAC, MP3, MOV, MP4, WMV, MTS, and M2TS and more.
Watermark
- Choose a video file you want to edit. Click Effect button to open the Video Edit window and switch to "Watermark" pane in which you can edit video image by pressing the
"Watermark" tab. Check the box "Enable Watermark" to activate adding watermark feature. Text watermark and picture watermark are enabled here. And you can customize the transparency, position and
size of the watermark. For text watermark, you can also set its font, color, size and style etc.

- 1.Check "Text" box if you want to add text watermark and enter the watermark text in the textbox. Click "T" to choose a desired font, style, size, effects and click "Color" to choose watermark color. You can simply drag the text watermark to desired size in the Output Preview.
- 2.Check "Picture" box if you want to add picture watermark and click "Browse" button to choose a picture as the watermark from local disk.
- 3.Set watermark vertical position and horizontal position by enter a value in the "Vertical" and "Horizontal" box or simply drag and drop the text watermark to preferred area.
- 4.Set watermark transparency: Enter a value in the Transparency textbox to change the watermark transparency.
Tips
- 1.The watermark will be displayed in the "Output Preview" window. Always check and preview to see if the watermark is in best fit.
- 2.You can either add text watermark or picture mark. You cannot add both of them to output videos.
- 3.Click "Reset All" if you want to restore the settings to defaults.
- 4.Check the box "Apply to All" if you want to apply the effect to all video files.
- 5.Click "OK" to save the settings if you have completed editing of watermark.
Resources
FREE Download and Start Enjoying Now (49.91MB)
Learn more about Bigasoft Total Video Converter
for Mac ...
More Articles on Bigasoft.com ...
To find out more Bigasoft Solutions to enjoy your new digital life, you can go here.
Posted by Emily Moore. By the way, you may join me on Google+.